Translate

Tuesday, July 19, 2016

I know it has been a VERY long time since my last post!  I just really needed to take a break and just craft for a bit.

In that time I have been SO busy!  Lately I have really gotten into making cards.  I think maybe the best part about that is the almost instant gratification you get from them.  As a quilter that can work on a project for MONTHS. Then finally get the gratification of the finished project (or have the project end up as one of those UNFINISHED projects that end up stuffed in a box)  it is so nice to actually be able to start on something and finish it the same day!

I have been doing lots of vintage style cards.  I will be sharing those with you in the next few posts.  I would LOVE feedback on what you think.  I am considering opening an etsy store and selling them.  So let me know if you think this is something I should consider strongly.

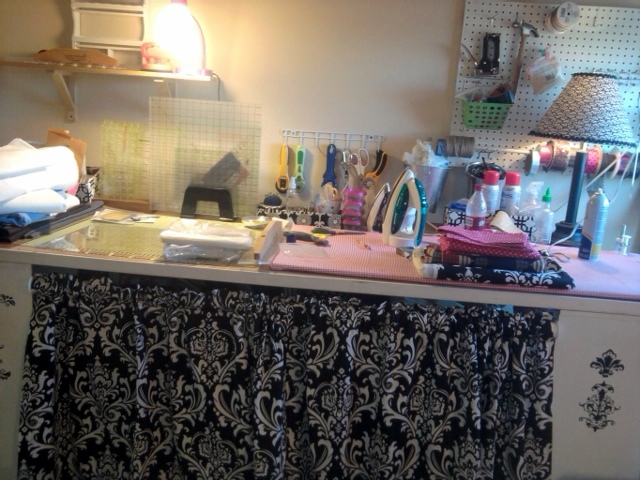
I have also moved and completely revamped my craft room!  I gotta say it is exactly what I have wanted and dreamed of for a very very long time and I just cannot WAIT to share it with you.  It is ALMOST finished!  IKEA is the BEST for craft rooms.  I will show you what I HAD and and the new one.  I think you will agree it is a MUCH improved room.  I spent years drooling on some of the rooms I saw on pinterest for so long!  So it was such a blessing to be able to create my craft room using that vision.

I plan to share it very soon!

In the meantime, here is the card I made this week.  I hope you like it.  Also PLEASE tell me if what you think!  I have not been making cards long so still working to find my way.

This card is a wedding card I made.  I used Wedding Tilda to make it as well as Pion Design papers.  The flowers I got at Wild Orchid, and the punch is by Martha Stewart Punch Around the Page punches.

I colored the stamp using distress ink markers.


I also made this card.  This one was a quick one.  I love coloring the stamps.  But I also enjoy using digital images to make cards.  So I try to make each kind when I make the cards and the creative juices are flowing!


As with the first card, I used Pion Design papers.  This one is from the Paris Flea Market line.  I can't recall the line I used to make the first card.  Let me know what you think!  I will try to start posting regularly now.

Take care!
Erin

Monday, August 18, 2014

Altered Keepsake Box


I know it has been quite some time since I posted anything.  Well the truth is that as in all things, my crafting has changed a bit.  Don't get me wrong, I still love quilting and have no plans to stop anytime soon.  But making a quilt can take quite a bit of time.  And frankly at the end of it, you are really trying to just get the darn thing finished!!  

After working on a very lengthy quilting project, I found myself needing to do some crafts that didn't take quite so much time.  I have made quite a few things during my hiatus from blog land.  I thought I would share some of them with you.  Over time of course.  If I just threw them all out there now, I wouldn't have anything to share with your for a while.  So I will just share them slowly and throw in some things I am working on now too.  

The below pictures are of a wood box I altered as a Christmas gift for my oldest daughter.  I had a blast making it too.  I started by decoupaging it with some vintage style card stock.  Then I used some Tim Holtz distress ink (vintage photo) all over to really beef up the vintage look of it.  

The pearl "G" is for my daughter's last name.   


 I thought it would be a great idea to add to the vintage keepsake theme, to include some vintage family photos.  The one on the left is my mother (her granny) when she was 17.  The photo on the right is of my grandmother and grandfather (her great- grandparents) when they first got married.  She really loved this touch.
 I decoupaged the inside and added some ruffled material and lace/
 More lace on the outside and some really beautiful beaded leaves to add into the floral bunch.  There are also some rhinestone & pearl flourishes that you can see, barely.


 I enjoyed making it.  But I really loved her reaction to receiving it.  It made all the work worth it and made me want to give my family even more.  It feels so good to be able to give those you love something that comes from your heart.  Something that they can hold on to, even after you are gone.  I really enjoy crafting.  I also love being able to give those I love something beautiful.

 Thank you for sharing this moment with me.  I hope you come back to see more of my crafting creations!

Erin


Monday, February 11, 2013

Finally made one of these!

I have been admiring these for so long! There are many variations of this project out there in the blog world.  Lots and lots of tutorials.  I actually made mine using a combination of a few of them.  I planned to do my own tutorial, but honestly I don't think I could have done better than Kristen at KSarahDesigns did on hers.

Kristen's
I plan to add a light kit to mine as well as soon as I can make that trip I have been dying to make to Ikea!
This project actually was started on Thanksgiving evening.  I had quite the assembly line going of me, my daughter Ryan, my niece Jaycee and my grand daughter Avery. I  ran out of wax paper right in the middle of the project.  I was surprised at how much it used.  Because the girls were  having so much fun I broke one of my cardinal rules and went to Walmart to pick up more.  Now obviously, going to Walmart is not against any rule of mine.  It wasn't that.  No no no...it was WHEN I went.  This was THANKSGIVING EVENING...yep you got it...I went to Walmart on BLACK FRIDAY!!!!  It took me no less than an hour and a 1/2 to pick up on large roll of wax paper!  Having never been there on this particular event, I was really shocked and amazed at what people go through to get a deal.  The wax paper just happened to be on the grocery isle designated for a low priced computer!  ALL the carts GONE.  The self check lines..no longer self check out.  This had been my plan but it didn't work out.  So I waited in awe of it all.  Did I grab a few items that were marked way down?  Of course I did!  I am a living breathing woman and grandmother.  Walking past a great deal without actually taking advantage of it, is almost against my religion!


As we were making mine, Jaycee & Avery we decided that we would also make one for their rooms.  We are still working on those, and are actually making those a little different.  I will post a tutorial on it very soon.  Let me just say I LOVE how those are turning out. It really put a great spin on it for a teen and preteen girls room!  I cannot wait to get them finished and show you.  Really cool!

Here is mine!  The photo quality is not that wonderful.  I should have taken advantage of a great deal on a camera too while I was there!  I however have a hard fast rule of not buying anything for me during that time of year until I have completed all of my Christmas shopping. A decent digital camera is on the top of my wish list though!


 I used embroidery hoops to attach the shells.  I painted them white so they would blend.


  If you want to make one of these, there are so many blogs with their own variations and tutorials..


Thrifty decorating

Freshly Picked's version


This is just 2 of them... believe me if you google "faux capiz shell chandelier" you will find tons of them with many differing variations on how you connect them, what material you use to make the shells, & what you use as the base. Some are pendent style and some are attached directly to the ceiling.  Which variation you choose to use is all up to you, or use a combination of several of them.  Just get creative and make one!  There is even one that uses strips of wax paper instead of round pieces.  I really tried to find that link for you but wasn't successful.  Just google away.  You will find it!

Till next time, take care and have fun being creative!  

Erin 

Wednesday, January 30, 2013

So much has happened since my last post.  I have moved back in with my mom in Forney. With my health being as it is, living on my own with my 13 year old son (who is a handful on good days!) is just not feasible   At first, I was really concerned about it.  I was worried so much about losing my sewing room as well as my office.  This is not only the room where I sew and create, it is also where I work part time.  My mom's home is very large and she has a media room that is pretty much sitting empty.  So, she said I could convert it into my sewing room/office.

The room is actually larger than the room I was using in my home.  So for the first time ever, I am able to set up my quilting frame in my sewing room.  Also, because I am not broke every day as I was before, I was able to purchase a new sewing machine and put the Viking on the frame as it was purchased to be used.  

ready to use!
lights, camera, action!
Isn't she purdy!
For the first time EVER I finally loaded her up and started trying to practice using her on a couple of pieces of muslin.  I was starting to really get the hang of it and had worked out my tension.  Then it jams up and scares the ever lovin'..you know what out of me!  From what I can gather a piece of thread caught somewhere along the plate that covers the feed dogs and pulled it up.  When this happened the needled came down on it and bent the plate so now it will not go back on it snugly. I am not sure if the plate is the problem or if it has jumped time now. When the needle goes into the quilt, the thread is not catching anything! It won't even bring the bobbin up. I fear the timing is off on it now.   

It's just as well.  It's probably best to give her a tune up and servicing before I put her to work as hard as I need. I have 5 tops  waiting to be quilted.   

See here I have her loaded up and ready

Not too bad?
The room is a mess right now.  I am still working on it, as you will see.  But she is coming along beautifully!  I purchased this beautiful Armoire from my brother.  He gave me a great deal.  I am thinking he may have regretted that later though.  Moving this giant up the stairs was really touch and go.  Finally, and much to my his relief it was up the stairs.  Though we have decided if my mom ever chooses to sell the house, the armoire will go with it!
You cannot beat these for storage

These are fantastic for storage!  As of today I have just got it cram packed full of stuff.

I am getting storage containers to use inside and get some kind of system going.  I also have another peg board that I am going to cut to size and mount on the inside of the doors.  This would be a great place for those tools that I use rarely. But still need often enough not to put into my other black hole...the closet. (not going to show a picture of that place!)  That will be another project to do once I get the room under some kind of order.

My absolute favorite addition to my sewing room is my new sewing machine.  The Viking Mega Quilter is only a straight stitch machine.  The machine I was using before I purchase the Viking was a Singer 7426.  I just hated that machine.  It was so loud!  The Viking was so smooth and fast.  BUT again, straight stitch only.  This is really what I do 98% of the time.  But then I have that 2% of the time that I need a zig-zag or blind hem stitch for applique.  I had been just putting the projects aside that needed anything other than a straight stitch in the hopes that some day soon I would have the money to purchase another machine or break down and use the singer.  Well after moving into my mom's I got my first paying job!  A lady I had met through a group called Free-cycle where you post items you are trying to get rid of for free to anyone willing to pick them up.  You know the old adage "One man's trash is another man's treasure."  She had given me a ton of fabric from cleaning out her sewing room back when I first began sewing.  So in all honesty, I would have done the job for free for her!  But she insisted on paying me.  I wish I had pictures of it!  It turned out great.  I had to do some improvising to get the backing and border fabric to be large enough, but it came out great. It was a baby quilt for the lady she works for.  I needed to applique the baby's name on the back.  So I broke down and purchased a new machine after trying to use the Singer.  I had been doing a ton of research and testing several machines.  I wanted certain features which normally come on a machine that is over 1,000.00.  I finally found one that was only 800 and had everything I wanted and more!  I purchased the Juki HZL-F400.  

I love this gal, she is so quite and smooth.  She actually FMQ sitting at my sewing table as well as the Viking did, if not better.  

This is just a sneak peek of my new favorite room!  More to come as I get it all finished up!  Right now I am knee deep in fabric folding it to put it in some way where I can keep a better idea of what I have.  Till now I have been folding it and storing it under my cutting/pressing table.  Which works well except for one major problem.  I forget it is there!  One thing that I do when I see something I want to make is start going through my stash in my head to see if I have fabric to make it already.  This way no need to buy any more right?  Well I have a very hard time remember what I actually have much less how much!  I am hoping that by having it in a place where I can see it better, it will not only help me remember what I have but inspire me to use it! 
Just a small amount of my favorite fabrics
I also am wanting to install some shelving.  I have a wall space above my cutting table that would be perfect for shelves that go up about 4 sets. I want to get one that has the cube storage for the bottom shelf, then about 2 or 3 shelves mounted on brackets.  That way I can get some of my knick knacks up and out of the way.  

need wall shelves where the small wood one is now but much longer and several of them

So it is coming along again.  Slowly but surely.  I am certainly not flush with cash. I am however not nearly as strapped as I was before.  I still have rent to pay and bills.  However, before it was just me bringing in the only income and that was only my disability.  Now I have a part time job to help get me back on track and no longer having to support my husband too.  Things are definitely looking better!

I have added my pinterest button on the right side of the page.  If you are into quilting or anything related to sewing, crafts, DIY and related, you have to check it out.  I have thousands of pins and more than 30 boards.  There are so many tutorials, free patterns, fabric shops, and even links to sites that will give you the plans to build things!  There is really something there for everyone.  Be careful though it is HIGHLY addictive!  But...what the heck!  Its all for fun!

Till next time, I will try to blog more and post more on what I am working on.  I am about to start a new quilt today.  I have really come to like the modern quilts and am going to start one today! Yeah!  I will keep you posted on it!

Wednesday, July 4, 2012

Bridal shower/bachelorette party for my oldest daughter


My oldest daughter is getting married next month.  We began the kick-off to the traditional parties that proceed the wedding.  Her wedding is a destination wedding which will be in Gulf Shores AL.  I cannot wait! She is marrying a great guy.  My oldest daughter has given me so much joy.  All of my kiddos have.  Each in their own way.  My oldest has by showing me that all of those talks, all of those times I tried so hard to tell her the things I wanted her to know, remember and most of all APPLY to her life got through.  Seeing that all come to fruition gives a parent such a great sense of accomplishment.  Like it was all so worth it.  She is such a beautiful woman inside and outside.  I am just so happy for her but more than anything I am PROUD!


She was such a great sport throughout the party.  Embarrassed on occasion by the personal gifts given to her by her wonderful friends. My daughter is very very beautiful but she is also unbelievably modest.  After a few drinks she did lighten up quite a bit.  The whistle she was given shaped like a certain male body part was blown more and more as the shots came her way!


I made my daughter a couple of things.  I got the tutorials to make them from one of my absolutely favorite blogs Shanty2chic.

I made her this plaque. Honestly, I had my doubts about how this was turning out.  It just needed something but I couldn't come up with what! Eventually I decided to do a finish on it.  It came out pretty good.  Again, had my doubts but it all came out great in the end.

She liked it and that is all that matters right?   You can make of of these too.  The tutorial is here.  I made mine on a piece of MDF.

I also made her a set of apothecary jars.  I had made a set for myself and my mom too.  I did hers a little different.
Again, I got the tutorial to make this gift from Shaty2chic's site.  You can find many other sites that will give you a tutorial to make them.  I just like the tutorial style they made the best and went with it.  Again, she loved it.  I used some wired edge burlap ribbon I had to embellish them.  They came out great I think.  I tried to make them a little different from mine and my mom's set.

After the gifts were given it was off to the bachelorette party WOO HOOO! Nope no male dancers, (not that I didn't beg for them!) strippers or any kind of pickup bar! My daughter isn't into that kind of thing.  We had a blast though.  An unexpected one.

We went to a restaurant/bar in Rockwall close to home.  It had recently started having dueling pianos much like the place downtown called "Pete's Piano bar" which is a really fun place to go.  We had been before to Pete's.  My brother in law Richard, worked there in the past.  He is not actually my brother in law.  To be exact he is my brother's brother in law! Yeah, go figure out that one!!!  Richard is a VERY talented pianist.  He is actually a Grammy award winner.  He wrote some of the music in the Beverly Hills Cop II or III and the soundtrack won a Grammy! Pretty cool huh! How many peeps can say they have a Grammy award winner in the family?  Anyway, I got off track there! The surprise was when we walked into Avante, there was our bro Richard! We had no idea he worked there! So he really did make the night special.  See the pics.  As you can see it was a blast!


The above pictures really need no explanation do they?  Girls just having fun and acting crazy!  Then they called ME to the stage.  I am VERY VERY shy! I was NOT drunk at all so I cannot TELL you how much I didn't want to go up there.  But after all this is for my daughter and they had all been such great sports, I really had no other choice.  This is when I was sang to by on of the other pianist..lol.. Honestly, I cannot even remember what he sang.  All I wanted to hear was you can leave the stage now!! lol The best thing was when I looked and there was my daughter, coming to the stage with me as we my other daughter.  They came up there so I didnt have to do it alone! Boy was I thankful to them! 
Here are my two oldest girls...beautiful aren't they.  I am biased for sure.  
Here we are for our photo op! Just the family.  My daughter Ashley, Richard, my sister Kelli, me and my other daughter Ryan.


It was a great time! They went on to another place after Avante closed.  I went home.  Not the party girl I use to be I guess! But still, I had such a wonderful time.  It is really nice when you can go out with such wonderful people, have a blast and the best part is some of those people are your family! Now that is when you know how truly lucky you are!


Tuesday, June 5, 2012

FINALLY finished livingroom curtains!

After going through blog after blog, I finally settled on how to do the curtains in my living room.  I knew I wanted to use drop cloths.  I like the style, texture and even more the savings they offer.  I was hung up on how I wanted to do them.  I like the contrast of having dark and light.  I happened upon an extra long table cloth in the clearance section at Walmart.  I used it for the top.  I wasn't sure if I wanted the contrast material on the top of bottom of the curtain.  The more I thought about it, the more I thought having them on the top was the best option.  Mostly because of the weight.  I wanted them to hang well and in my mind I thought having the lighter material on the bottom might keep them from hanging as I wanted them to.  I could be way off on that, but I didn't want to get them all made, only to discover I should have gone with my gut.  By using the contrast band, I was able to make both sets using one 6'x9' package.  This was great! I later found this to be even more important since I discovered they have a slight variance in color from package to package, even when you use the exact same brand.   I am really happy with how they came out!!  I purchase the tiebacks at Lowe's as well.  They were a whopping 2.00 a piece!! YEAH!


Now get this, in my search of saving the almighty dollar, and blog searching I discovered a tutorial of how to make your own curtain rods!! Yes!! It cost me a total of $5.00!!! That is for BOTH rods!! You have to measure exactly how long you want them since you are cutting them and they are not expandable.  I painted them with oil rubbed bronze.  I purchased 2 pkgs of clip rings.  Each had 14 clip rings for only 7.00!


I plan to make another set.  I will post a tutorial on how I did them when I do.  I was too nervous making these to have been able to document each step as I needed to.  I was also not all that sure how it would come out.  Now that I have made one set, I feel confident enough to tackle another! Maybe even improve on it a bit!.  

I cannot recommend this enough! I was able to make the curtains and curtain rods as well as buy the clips, brackets and tiebacks all for under $55.00.  That is BOTH windows complete!! There is nothing that looks home made about them! This is the first set of curtains I have ever even attempted.  Keeping in mind I have been sewing for all of a year! If I can make these anyone can! So get out there and get your DIY ON!! Step back and see what you can do.  Feel that overwhelming sense of accomplishment that YOU did it! Even saved a bundle doing it! My DH is so proud of them! I think he may have even been shocked at how well they came out.  I was too to be honest.  Now I cannot wait to tackle my next project.  

Have a great day!!
Erin

Sunday, June 3, 2012

FINALLY completed the living room curtains!  After pouring all over blogland, in search of a DIY plan that worked for my livingroom (and pocketbook) I finally settled on a hybrid of several.  I made my own curtain rods using metal 3/4" conduit, some wood dowels for the ends to give my screw in finials something to grab onto and the finials I purchased at hobby lobby. I was a bit nervous going in, but with the cost being so low, I figured if it was a project that failed, I could afford it.  Turn out GREAT!


You would NEVER EVER guess these were DIY rods! They look as good as the 20.00 rods you buy all the time for 25% of the cost! The curtain clip rings really make these even better.  I painted mine oil-rubbed bronze  but you can paint them black, white, antique white, or so many other possibilities.  Especially with all the different metallic paints they have now.  They are held up with one hole hose brackets and 1.5" L brackets connected by a nut and bolt.  You can make them in a double rod set too by using 2 hose brackets and a 2.5" L bracket! Like I said, it is really an easy thing to do for very little cost.

I used drop cloths.  I went with the 6'x9' set.  This was enough to do both windows.  Because I added some additional fabric to the top I was able to make them over 90" long.  With this exceptionally high wall, the height was needed.  I kept them plain so they did not compete with my fireplace as the focal point on the wall.  As you can see it is a very elaborate fireplace and I felt having curtains